Hello everyone, want to learn some easy and cool tricks for drawing a Rose? You clicked the right site. Drawing various sketches helps to build up your confidence. If you are new, always try with something simple and try to make it as beautiful as possible.
- How to draw a Pokemon
- How to draw a Pikachu
- How to draw a Mouth
- How to Draw a Hand
- How to draw a Superman
- How to Draw a Star
- How to draw a Sonic
- How to draw a Basketball
- How to draw a Brain
- How to draw a Cupcake
- How to draw an Emoji
- How to draw a Kissing
- How to draw a Mouse
- How to Draw a Nose
- How to Draw a Lion
- How to Draw a Monkey
- How to Draw a Car
- How to draw a Deadpool
- How to draw a Deer
- How to draw a Doraemon

We will learn how to draw a rose easy?, how to draw a realistic rose?, etc. Drawing is something which cannot be learnt by only practising, the most important thing is your imagination level. Can you draw whatever you imagine? An artist becomes really good when he can sketch things that are on his/her mind. So, guys keep on practising all these simple techniques till you master this stage.
How to Draw a Rose step by step for kids?

Today we will be learning some easy ways to draw a simple rose for beginners. Parents don’t worry if you can’t help your kids. By following our simple ways, you can easily teach your kid to draw a beautiful flower. If your kid has got a project of drawing a flower and you don’t know what to choose. Why not be a rose?
Roses are one the most gorgeous flowers that signify love. Its aura and essence captivate people into a realm of peace and love.
I have tried various techniques for drawing a rose and I am sharing with you one of the simplest ways to draw it without taking much time.
How to draw a Rose Flower Easy?
Are you really a beginner? Even if you are, there is nothing to be tensed. If you have confidence and the zeal to achieve something, you surely master this art. Always use pencil if you are a learner so that you can rectify your mistakes. Always be focused when you are drawing and be relaxed, then you will really enjoy what you are doing.
So grab a pen or pencil and a sheet of paper just follow the steps below.
Tutorials to draw a rose step by step for beginners
Step 1 First step is very easy. Just draw a small bean like shape in the middle of the page as it is the centre of the rose. The oval need not be perfect. Regardless of your shape, the rose is going to look great. Step 2 Now draw a spiral outside the oval. Neither the direction nor the number of turns is important.

Step 3 Now draw exactly two twisting lines adjacent to the spiral lines. It will help us to make few petals of the flower.

Step 4 In this step draw three small lines as shown in the figure which will form the centre of the rose.

Step 5 Now draw a U shape from the top which forms the blossom of our rose. Divide the U into two leaf-like structures.

Step 6 We need to complete the rose by surrounding the whole figure with some simple curves, which forms the outside petals of the rose.

Step 7 Just draw 2-3 sepals under the flower which forms the base of our rose. Draw a curved long double line which will form the stem.

Step 8 Add a few leaves to the stem to complete the rose.

Red rose drawing easy steps

After completing the above rose, you want that your rose looks more beautiful and attractive. So, you have two options either shade it or colour it. Colour the main rose with red and the stems and leaves with green. Now, you are done with your flower. Have look at it. Are you happy?
How to draw a realistic and open rose step by step?
Congratulations everyone, now you have completed successfully drawing your first simple rose. So, now get ready, we will be learning a new method to draw a bit complex rose which will be more beautiful and realistic. Want to impress your friends by showing your art? Why not gift them a beautiful sketched rose? Be calm and cool to master it.
Again get back with your pen and paper and be focused. Follow the steps below:-
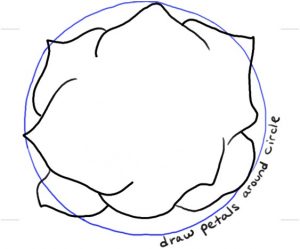
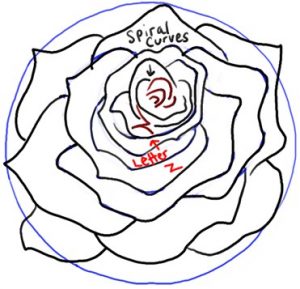
Step 1 First step, lightly draw a circle.

Step 2 From your first drawing, you know how to draw petals. Just draw petals surrounding the circle. Keep in mind while drawing a petal always the tip should be pointed.
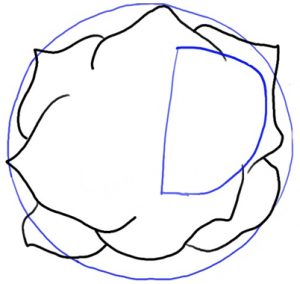
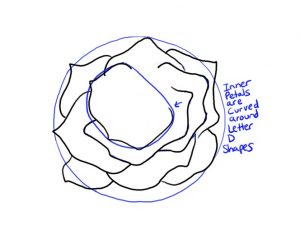
Step 3 After completing the outer petals, we need to draw the inner petals. For that reason, draw a light semicircle figure as shown.
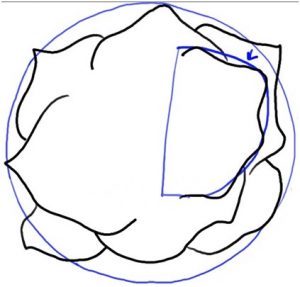
Step 4 Now within that semicircle, draw the inner petal. These are curved around the semicircle shapes.
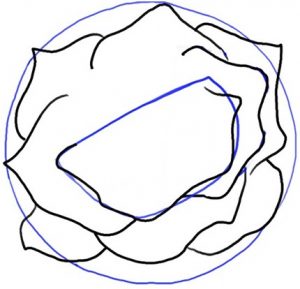
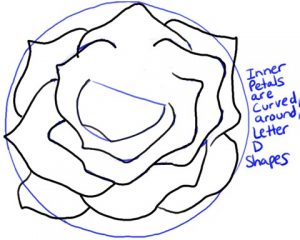
Step 5 Lightly draw another semicircle 45⁰clockwise from the previous one and draw petals within it.
Step 6 Again lightly draw another semicircle 75⁰clockwise from the previous one and draw petals within it as in the figure.
Step 7 Now draw a small semicircle within the previous one and form a single petal within it.
Step 8 At this point, you may see that only the inner portion is empty. So draw a oval like structure connecting all the inner points.
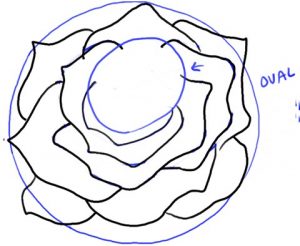
Step 9 Surround the oval by drawing petals.

Step 10 After completing this, again draw a small oval within the previous one. Draw petal within it.
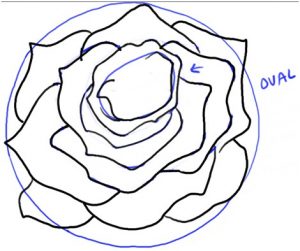
Step 12 The portion where the petal is not joined. Draw a reverse U.

Step 13 Keep on drawing letter U shapes within it i.e. we are just completing the remaining portion with spirals.
Step 14 Now draw the leaves around the circle in Step 1 covering the whole rose.
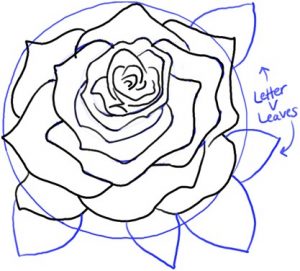
Step 15 A rose becomes realistic when the leaves are jagged i.e. curved. Inside of the leaves are also detailed with veins. Draw a middle line within the leaf with sub veins spreading from it.
Erase the outlines and darken the boundary lines. Now you may colour the rose as you like.
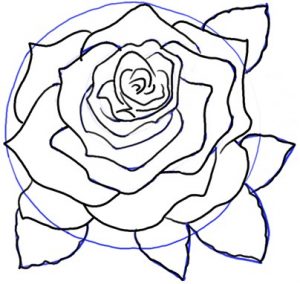
There you go, your tutorial is complete. Hope you learnt from us.