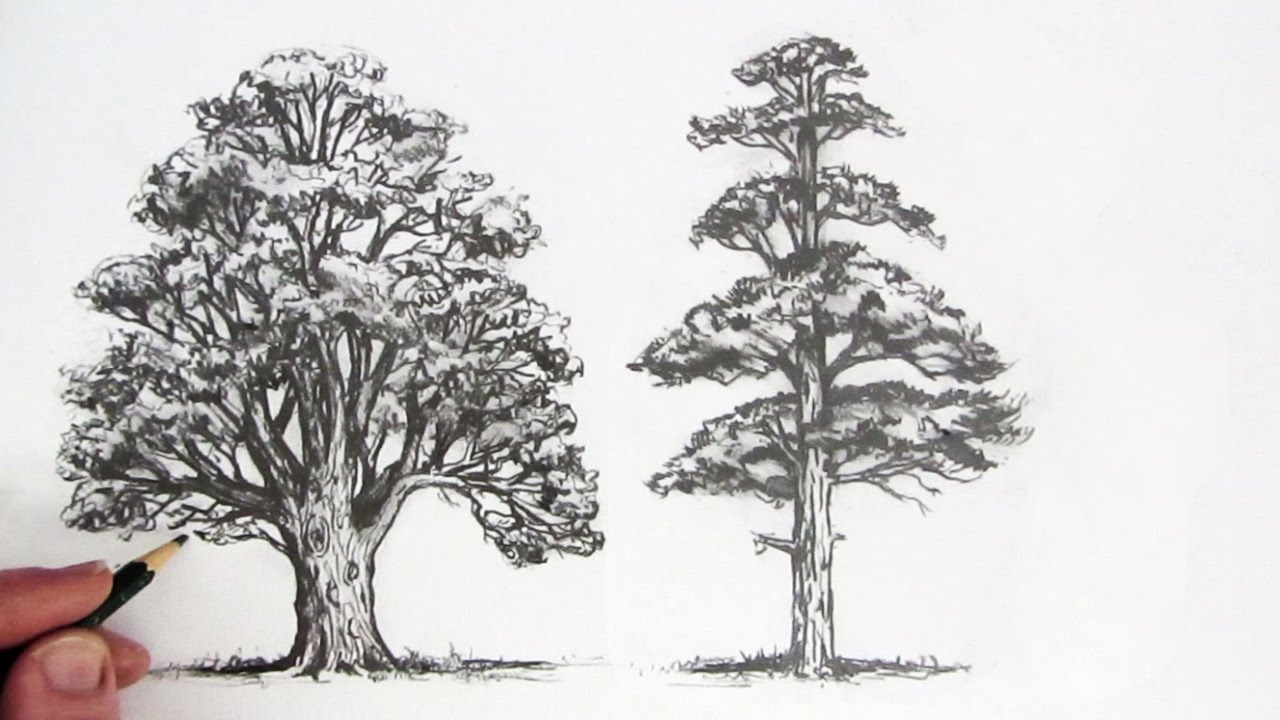
الجميع يعرف كيف ارسم شجرة. إذن ما هو الهدف من هذا البرنامج التعليمي? النقطة الأساسية هي التفصيل. حيث, رسم هذا سهل ، فنحن مهتمون بكيفية جعله أكثر واقعية. يمكنك التفكير في أنواع مختلفة من الأشجار مثل عشية عيد الميلاد ورسمها لمزيد من التدريب.
- كيفية رسم بوكيمون
- كيفية رسم بيكاتشو
- كيفية رسم الفم
- كيفية رسم اليد
- كيفية رسم سوبرمان
- كيفية رسم نجمة
- كيفية رسم سونيك
- كيفية رسم كرة السلة
- كيفية رسم دماغ
- كيفية رسم كب كيك
- كيفية رسم ايموجي
- كيفية رسم التقبيل
- كيفية رسم الفأر
- كيفية رسم أنف
- كيفية رسم الأسد
- كيفية رسم قرد
- كيفية رسم سيارة
- كيفية رسم ديدبول
- كيفية رسم غزال
- كيفية رسم عبقور
سأعرض أيضًا أنواعًا مختلفة من التقنيات لرسم أنواع مختلفة من الأشجار.
الأشجار هي أهم جزء في الحفاظ على نظامنا البيئي. تساعد الأشجار في تنظيف الهواء وتزويدنا بالأكسجين. إنها تساعد على تنظيف مياهنا وتوفير بيئة باردة. العامل الرئيسي هو أنهم يحاولون تقليل آثار التغير المناخي. تؤدي إزالة الغابات إلى الاحتباس الحراري مما يؤدي إلى ذوبان الأنهار الجليدية والذي يؤدي بدوره إلى تغيرات مناخية. لقد ارتفع الجشع البشري لدرجة أنه سيؤثر سلبًا علينا في المستقبل القريب. لذا أتمنى أن تعرفوا أيها الأطفال أهمية الأشجار. لذا, بعد تعلم رسم شجرة, عليك أن تذهب وتزرع شتلة في حديقتك الخاصة. هذه الخطوات الصغيرة التي اتخذتها يا أطفال ستساعدنا في تأمين مستقبلنا.

يكون الأطفال دائمًا نشيطين ويستخدمون أفكارك الإبداعية أثناء الرسم. إذا وجدت بعض الطرق الجديدة أو كنت لا تتفق معي, يرجى أن تكون حرا في ترك تعليق. الآن, استعد بالقلم الرصاص والورقة واتبع خطواتي.
كيفية رسم شجرة خطوة بخطوة?
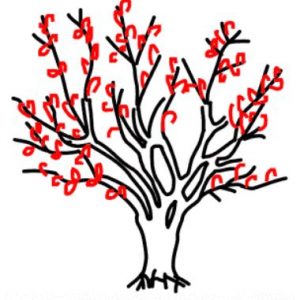
خطوة 1 في هذه الخطوة نرسم الخطوط العريضة للجذع والفروع. يجب أن تمتد الفروع لأعلى.

خطوة 2 ارسم دائمًا الفروع في أزواج. ارسم عدة فروع صغيرة من الفرع الأكبر كما هو موضح.

خطوة 3 اتباع المخطط التفصيلي من الخطوة 1 ارسم ملامح الشجرة والفروع وأكمل الجذع.

خطوة 4 الآن املأ الفروع بالأوراق عن طريق رسم خطوط منحنية صغيرة.

خطوة 5 هذه الخطوة صعبة حيث يتعين علينا تشكيل الأوراق. ارسم أشكالًا بيضاوية صغيرة لكل سطر من الخطوط في الخطوة السابقة.

خطوة 6 أضف بعض التفاصيل وقم بإزالة أي شيء غير مرغوب فيه. أعط ضربات من لون الماء لإكمالها.

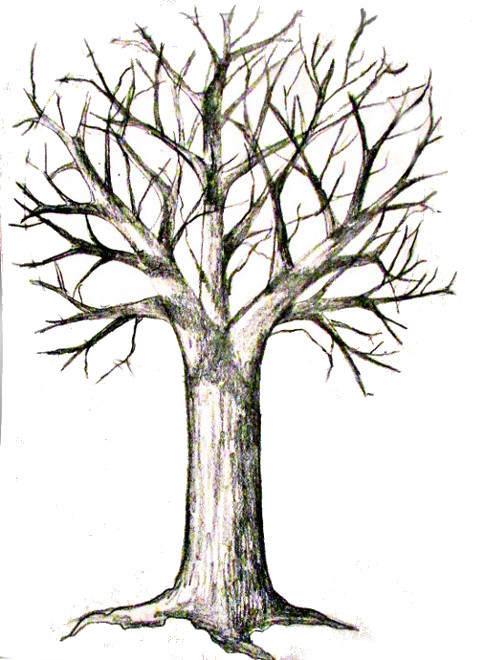
خطوات أساسية لرسم شجرة بسيطة بدون أوراق أو شجرة ميتة
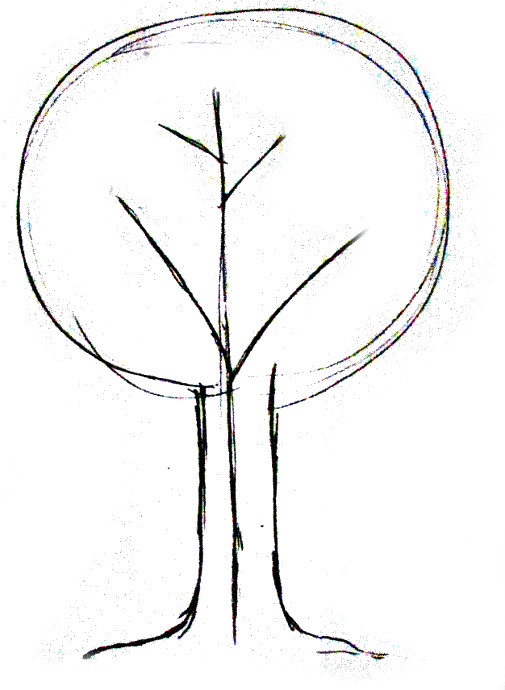
خطوة 1 ارسم خطًا واحدًا للجذع وشكلًا دائريًا للتاج.
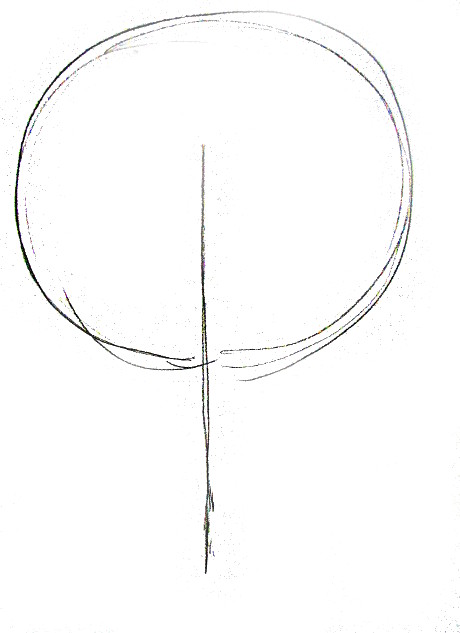
خطوة 2 ارسم بعض الخطوط المستقيمة للفروع
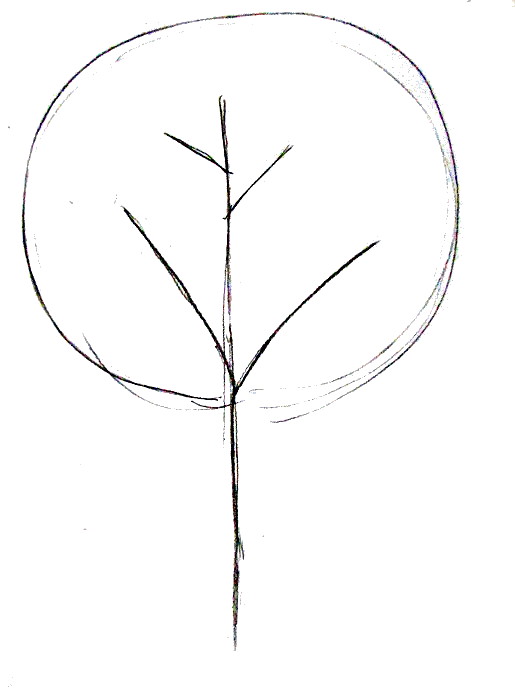
خطوة 3 الآن نرسم 2 خطوط متوازية حول الجذع لجعلها أكثر سمكًا وكذلك رسم الجذور.
خطوة 3 باتباع الخطوة أعلاه ، نجعل أيضًا الفروع الرئيسية أكثر سمكًا كما هو موضح.
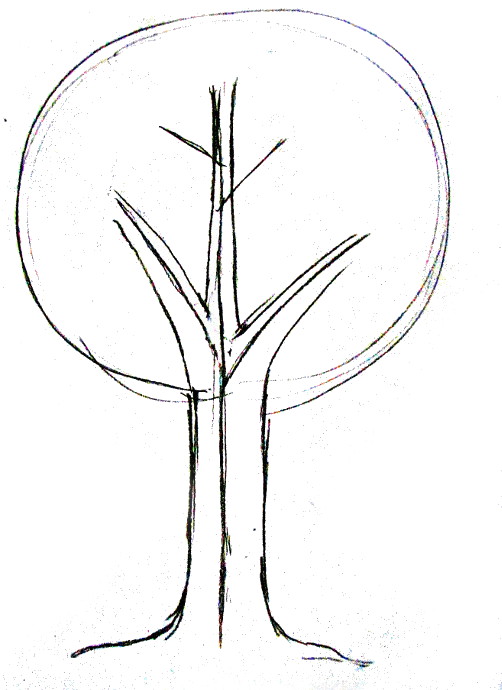
خطوة 4 الآن نرسم المزيد من الفروع الفرعية من الفرع الرئيسي.
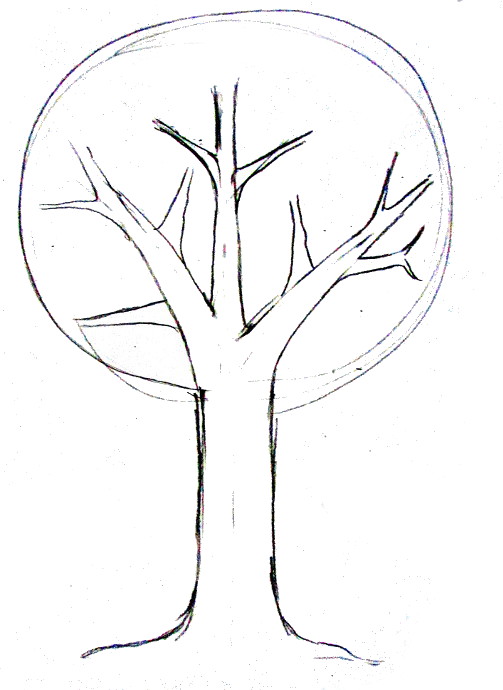
خطوة 5 أضف المزيد من الفروع الفرعية.
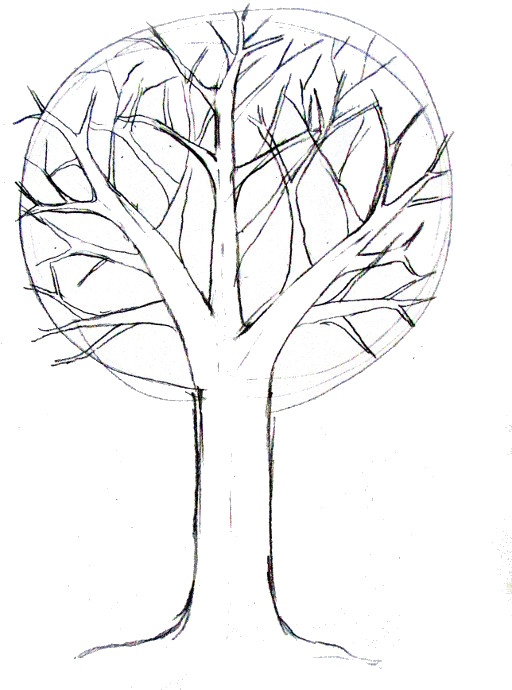
خطوة 6 ظلل الجذع. ستكون المناطق التي تواجه الشمس أفتح وستكون أغمق في المقابل للشمس وتزيل التاج الدائري. ستكون مهمتك هي رسم ظلال فرع يسقط على الأرض.
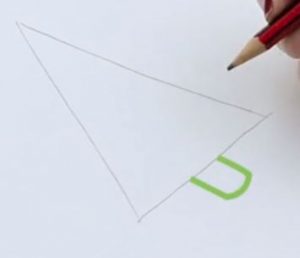
طريقة رسم شجرة عيد الميلاد
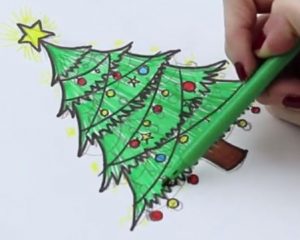
خطوة 1 ارسم أولاً مثلث متساوي الساقين وجذع مستطيل الشكل.
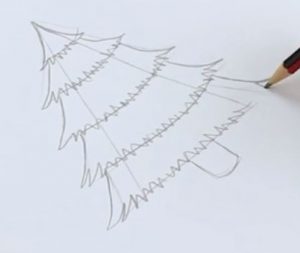
خطوة 2 الآن نحن نعمل على الجسم. رسم 5 منحنيات متساوية البعد عن بعضها البعض مما يدل على الأوراق من أعلى إلى أسفل.

خطوة 3 الآن نرسم الأوراق على حواف 5 منحنيات بمنحنيات مدببة صغيرة.
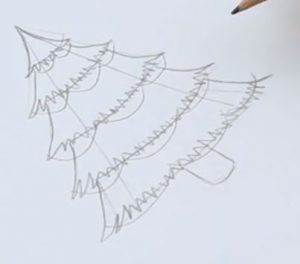
خطوة 4 ارسم حدودًا نصف دائرية على الشجرة حيث نرسم كرات صغيرة لعيد الميلاد تكون عبارة عن دوائر صغيرة.
خطوة 5 ارسم نجمة الكريسماس وأضف الزينة كما يحلو لك.

خطوة 6 امسح الخطوط العريضة ولونها.
طريقة رسم شجرة الصنوبر
خطوة 1 ارسم قاعدة أسطوانية حيث تقف شجرة الصنوبر. ارسم خطين متوازيين طويلين غير كاملين للجذع كما هو موضح.

خطوة 2 الآن ارسم الفروع وهي عبارة عن خطوط منحنية حادة. يعد بالقرب من الأسفل وأقصر بالقرب من الأعلى.

خطوة 3 نرسم الآن الأقماع لإظهار البراعم.

خطوة 4 الآن أحيط الفروع بأكملها بإبرة صغيرة مثل الخطوط التي ستشكل الأوراق.

خطوة 5 املأ الفروع بخطوط إبرة صغيرة لعمل الأوراق وإزالة الخطوط العريضة.

طريقة رسم شجرة نخيل
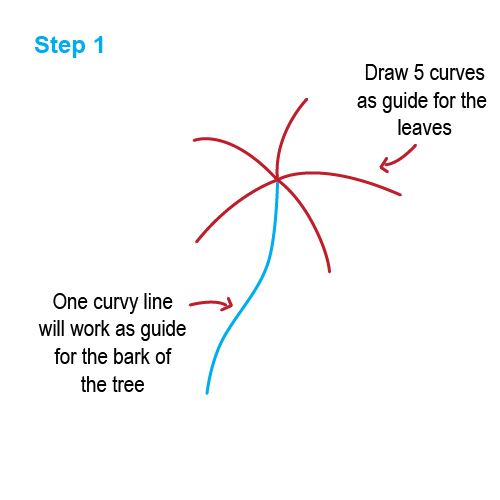
خطوة 1 ارسم خطًا منحنيًا للجذع وخمسة خطوط منحنية أخرى عند الحافة لمخطط الأوراق.
خطوة 2 ارسم الأوراق بالحفاظ على 5 بين الخطوط.

خطوة 3 ارسم بعض الأوراق الإضافية بين الأوراق الرئيسية.

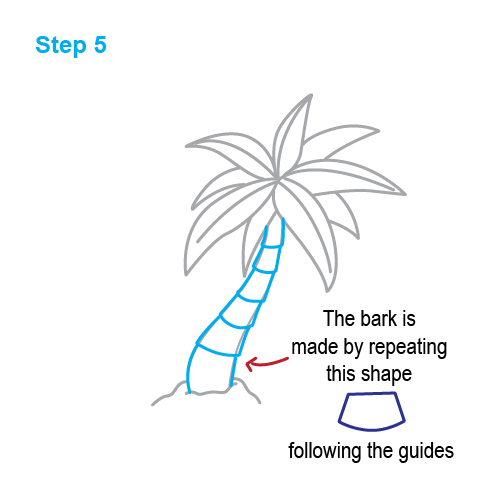
خطوة 4 يتيح تشكيل الجذع. أرق بالقرب من الأوراق وتصبح أكثر سمكًا ببطء وأكثر سمكًا على الأرض.

خطوة 5 الآن نرسم لحاء الشجرة برسم خطوط منحنية.
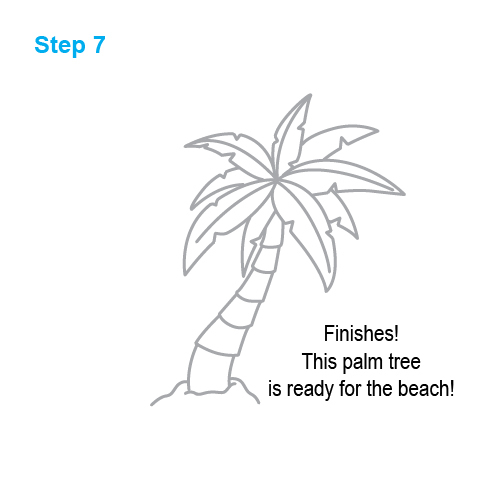
خطوة 6 يتم إجراء بعض التفاصيل على الأوراق وشجرة النخيل جاهزة.
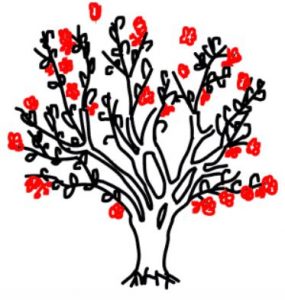
كيفية رسم شجرة الكرز للأطفال?
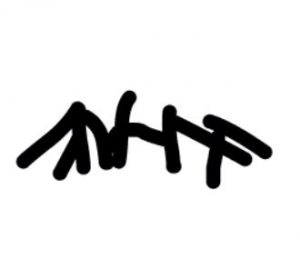
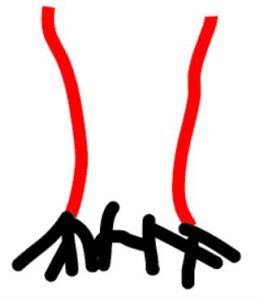
خطوة 1 أولاً سنرسم الجذور المقلوبة على شكل حرف V..
خطوة 2 الآن نرسم الجذع, وهي على شكل عدسة مقعرة رقيقة في الوسط وسميكة في الأعلى والأسفل.
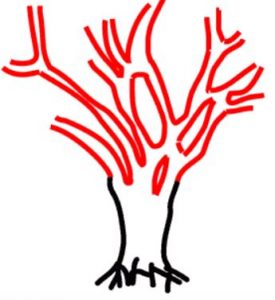
خطوة 3 في هذه الخطوة سنرسم فروع شجرتنا. نبدأ من الجانب الأيسر من الجذع, نرسم خطين منحنيين يخرجان من الجذع متجهين نحو اليسار فقط. نرسم المزيد من هذه الخطوط المنحنية المزدوجة الخارجة من الجذع في كلا الاتجاهين لملئه. الآن نحن نصنع المزيد من الفروع الفرعية للشكل V بدءًا من فرع فقط أو بين الفروع.
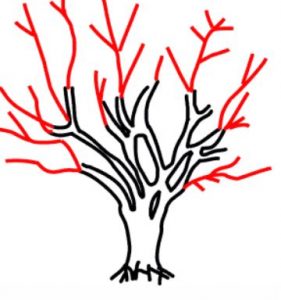
خطوة 4 الآن نرسم الأغصان التي تخرج من فرعنا ويمكن تقسيمها أكثر. يجب أن تكون الأغصان موجودة على جميع جوانب الشجرة.
خطوة 5 نقوم الآن برسم الأوراق حول الأغصان وكذلك بعضها في الفروع التي تكون بيضاوية صغيرة مثل الأشكال.
خطوة 6 الخطوة الأخيرة هي إظهار أزهار الكرز. نرسم دائرة صغيرة وأشكال بيضاوية تحيط بها لتشكيل الزهرة. يمكننا وضع العديد من الزهور كما نريد في الأغصان. زهر الكرز الخاص بك جاهز. هل أنت فخور برسمك? لا تتردد في ترك ملاحظة في قسم التعليقات.